Menu Template:
Green Orange Roll Over ButtonsAnimated Menu In Frontpage
This menu is generated by Expression Web Menu.
Create your own menu now!
To install the drop menu into your html page you should do the following things:
1). Create and save your buttons in any temp folder using Vista Buttons application. You canuse "Save as HTML" function.
You can enter any name you like, for example enter "menu":
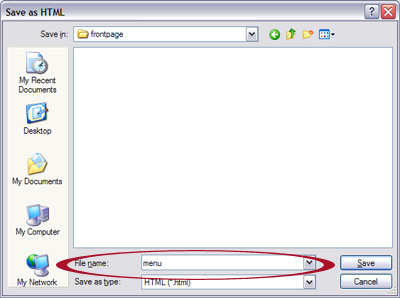
So you'll have menu.html file and "menu-files" folder with all menu files.
2). You can add javascript drop menu to a single page or to many pages using Shared Borders, Include Page or Dynamic Web Template so that you won't have to add it into each page separately.
- Start FrontPage and open your website. When the website opens, it should look like this:
- To create the shared border page you should do the following things:
Choose "Format/Shared Borders..." from the main menu. This will bring up the Shared Borders dialog.
- Make sure "All pages" is chosen in the 'Apply to' section. Check the "Top" checkbox to activate the top shared border page and click the OK button to close the dialog.
A new subfolder should appear in the Folder List section in the main FrontPage window with the top.htm file in it. This is our top shared border page.
Notice that you can choose any other shared border position to install the drop menu as well.
- Now you can add a menu for your site. Open the shared border page (double-click top.htm in Folder list window) and switch to the Design view mode. Decide where you would like the menu to appear in your page. Click in the spot you want the code to appear in and type the phrase: your code here
- Open the generated in Vista Buttons menu.htmlpage in any text editor. Copy all code within the following tags:
<!-- Begin Vista-Buttons.com -->
...
<!-- End Vista-Buttons.com -->
- Go back to FrontPage. Switch to HTML View. Go to the "Edit Menu" with FrontPage and select the "Paste" option to paste the menu code that we copied to the clipboard earlier. Since the phrase we typed was highlighted, it will be replaced when we paste the code in.
- To display the mouseover state images correctly you should change vbImgPath parameter. Find the following code
var vbImgPath="menu-files/"
and change it to
var vbImgPath="_borders/menu-files/"
- Now you should copy the "menu-files" folder into the same folder with your top.html shared border. (You should show hidden files to see files of your website. Go to "Tools/Folder options").
- Notice that in the Design mode your menu may be displayed not in the proper way. You should view the menu in the Preview mode.
- Select the Preview mode to display the top.html page live (in Internet Explorer). Notice that your mouseover images can be not displayed when you hover over menu items in the Preview mode. It is normal. You'll see all images when you open index.htm page in the Preview mode.
- That's all. You've added all necessary code to your page, so let's test it. Open your index page (double-click index.htm in Folder list window) and switch to the Preview mode.
- If everything goes well, save and publish your website. If something seems wrong, double-check that you followed all the steps correctly.
- If you still run into trouble, we'd be happy to assist you further. You can post your problem to us at , and meanwhile describe your files in details.